Siirtyminen tekonurmi vuonna 2025? Fiksu siirto, varsinkin jos hallinnoit vilkkaasti liikennöityä aluetta tai laajamittaista maisemointihanketta. Mutta koosta riippumatta kunnollinen asennus ratkaisee kaiken. Siksi olemme koonneet tämän kattavan ja ajantasaisen oppaan, joka auttaa sinua tekemään sen alusta alkaen oikein.
PS: Ammattilaisena tekonurmi valmistaja ja toimittaja, MightyGrass on tukenut satoja onnistuneita asennuksia urheilu-, asuin-, kaupallisissa ja julkisissa tiloissa. Synteettiset nurmikenttämme on suunniteltu kestävyyttä, salaojitusta ja luonnollista ulkoasua varten, joka kestää.
Jos sinulla on lisäkysymyksiä, kommentteja tai huolenaiheita, älä epäröi ottaa yhteyttä osoitteeseen MightyGrass ammattilaisjoukkue.
1. Tekonurmi asennus Työkalut ja materiaalit
Nurmikon asennustyökalut (tarvittavat ja/tai suositeltavat).
Lapio
Vasara
Jalkakäytävä Chal
Keskikokoinen tai jäykkä harja tai Power-Broom -harja

Pudotuslevitin (EI levitin)

Ruohonleikkuri (jos tätä työkalua tarvitaan, on 2 vaihtoehtoa: yksiakselinen tai kaksiakselinen.). Kaksiakselinen on hieman helpompi käsitellä).

Maisemointiharava (Hienoa pohjan hienosäätöön.)

Piha- tai puutarhaharava. (Hyvä yleiseen kiviaineksen levittämiseen.)

Levytyöntömurskain ja/tai tasaisilla pyörillä varustettu kaksoistrumpitela Ride-on-työntömurskain
Käyttö- tai mattoveitsi, jossa on 2-puoliset terät. (Samoja teriä voidaan käyttää tyynyn selkäleikkurissa ja silmukkanipun leikkurissa).

Tyynynselkäleikkuri (hyvä työkalu saumojen leikkaamiseen.)

Punainen Loop-pile Cutter (sopii erinomaisesti viheriön ulkomuodon leikkaamiseen).

Mattosakset ja/tai Duck-Bill-sakset (Duck-Bill-saksissa on offset-kahva).

Rivinetsijä | Nyrkki tai litteäkärkinen ruuvimeisseli. (Molemmat näistä työkaluista toimivat hyvin rivien löytämiseksi nurmikon sisältä).

Saumarulla

Pyöräkärry tai Bobcat sileällä kauhalla.

Ruutuharava tai raahausverkko (ei välttämätön, mutta loistava työkalu pohjan viimeistelyyn...!).

Raskas rulla saumausta varten (75-100LBS. vinyylilattiarulla tai käsikäyttöinen nurmikkorulla).

Lehtipuhallin (reppu tai käsikäyttöinen)

Asentaminen tekonurmi materiaalit
| Weed Killer | Merkintäliput |
|---|---|
| Puupaalut | Kenttämerkintämaali |
| Murskattu kiviaines | Synteettinen nurmi |
| Liima | Saumausliina |
| Kynnet | Täyttömateriaali |
2. Aseta alue ennen synteettisen ruohon asennusta
Hankkeestasi riippuen alueesi saattaa jo olla rajattu erilaisilla esineillä tai maisemakohteilla, kuten pensasaidalla, kivimuurilla, maisemapenkillä, aidalla tai jopa talolla.
Kuitenkin, jos alueesi ei ole määritelty, on aina parasta maalata pala, tai kappaletta, turvetta maahan tunnistamalla, missä jokainen nurkka ja puoli jokaisen turvetta pala tulee olemaan. Tätä varten haluat käyttää yhdistelmää merkintälippujen (tai panokset yhdessä kentän merkintä maali tunnistaa tekonurmi reunat.
Varmista, että työskentelet samansuuntaisia linjoja ja luoda 90 asteen kulmia, kun suunnittelu vaatii niitä.Kun olet nurmikon kulmat ja reunat merkitty maahan... voit spray-maalata kehä aiotun alueen.

3.Poista Sod ja valmistella Sub-base ennen synteettinen turvetta asennus
VAROITUS... VARMISTA ETTÄ ENNEN KUIN ALOITAT KAIVAMISEN, ERITTÄIN MEKAANISILLA TAVOITTEILLA, ETTÄ TIEDÄT, MISSÄ VIRTA- TAI VESIJOHDOT VOIVAT OLLA (On suositeltavaa, että otat yhteyttä paikalliseen lääninhallitukseen ja pyydät heitä merkitsemään maanalaiset johdot). Tämä on yleensä maksuton prosessi ja auttaa suojautumaan vastuulta, jos törmäät johtoon).
Kun olet varmistanut, ettei vesi- tai sähköjohtoja ole tielläsi, voit poistaa nurmikon. Ruohonleikkuria käytetään mieluiten tässä tehtävässä, ja se tekee työstä paljon nopeampaa ja helpompaa.Kun käytät ruohonleikkuria, haluat aloittaa leikkaamalla luomaasi reunaviivaa pitkin. Kun olet kulkenut alueesi kehän, siirry eteenpäin ja poista loput nurmikosta.Kun kaikki nurmikko on poistettu, on aika kaivaa pohjapohja. Varmista, että poistat riittävästi, jotta pohjan syvyys on oikea. (Lue vaihe #4 saadaksesi lisätietoja pohjan paksuudesta ja asennuksesta).
Asennuslisä:
Maantieteellisestä sijainnistasi riippuen on hyvä idea käyttää rikkaruohojen torjunta-ainetta raivatulla alueella ja/tai ruohonestosuihketta. Tämä auttaa estämään ruohon tai rikkaruohojen kasvua synteettisen ruohon läpi (käytä näitä tuotteita aina valmistajan suositusten mukaisesti).

4. Asenna tekonurmi pohja
On olemassa useita lähestymistapoja erilaisia tuotteita käyttää, kun rakennetaan pohja synteettisen ruohon. Tässä oppaassa puhumme perus aggregaattipohjasta. Lue vaihe #9 lisätietoa hyödyntäen naulainlevyt pitkin kehää turvata turvetta.
Jos nopea valumisnopeus on tärkeää, suosittelemme käyttämään kaksikerroksista pohjaa, joka koostuu "57-kivestä" (paksu pohjakerros - 75% pohjan paksuudesta) ja "1/4 tuuman miinus" (ohut pintakerros - 25% pohjan paksuudesta). Jos pohjan ei tarvitse valua nopeasti, voit käyttää yksikerroksista järjestelmää, jossa käytetään 3/8″-miinus tai 1/4″-miinus -tuotetta. Suosittelemme, että otat yhteyttä paikalliseen louhokseen ja kerrot heille, mitä yrität rakentaa. Heidän pitäisi pystyä auttamaan sinua paremmin tuotteen (tuotteiden) valinnassa ja paksuudessa.
Perimmäinen tavoite synteettisen turpeen pohjan luomisessa on, että se pysyy vakaana vuosia ja valmis luokka on sileä, joten et voi tuntea tai nähdä mitään pohjan eroavaisuuksia turpeen läpi.
Kun olet hankkinut oikean pohjamateriaalin ja pohjarakenne on valmis, siirry eteenpäin ja tuo kiviaines, luokittele se ja tiivistä se.
Huom:
ÄLÄ tuota materiaalia enemmän kuin tiivistyslaitteesi pystyy käsittelemään. Jos käytät levytiivistintä, suosittelemme tiivistämään vain kolmen tuuman (3″) kerroksen kerrallaan. Jos käytät kaksoisrumpujyrää, tarkista koneen tekniset tiedot/ominaisuudet vuokraamolta tai valmistajalta.
Asennuslisä:
Jos käytät "1/4 tuuman miinus" -materiaalia (jota joskus kutsutaan seulaksi, hienoainekseksi tai kivipölyksi), suosittelemme seulaharavalla pohjan viimeistelyä. Tämä työkalu todella auttaa tasoittamaan pohjan pieniä epätasaisuuksia. Tätä samaa työkalua käytetään baseball-kenttien tasoittamiseen.
Asenna pohja kaikessa rauhassa. Sileä pinta määrittää, kuinka hyvin nurmikko näyttää asennuksen jälkeen (et voi odottaa hienoa nurmikkoa ilman hyvin rakennettua pohjaa).
Leikkipaikkakohtainen asennus:
Leikkikenttäasennuksen yhteydessä voidaan tarvita putoamisvyöhyke itse leikkivälineiden alle ja ympärille. Tämä on hyvin yleistä ja vaaditaan kaupallisissa tai kunnallisissa hankkeissa. PolyGreen Foam -vaahtomuovipehmustetta voidaan käyttää synteettisen nurmikon alla ja murskattujen kiviainespohjien päällä turvallisen ja hyväksyttävän yhtenäisen leikkikenttäjärjestelmän luomiseksi.
Hyödyntämällä 2.125" PolyGreen Foam pad alle synteettisen turvetta net sinulle 6 jalka putoaminen vyöhyke.
Hyödyntämällä 1.125 "PolyGreen Foam pad alle turvetta netto 3 jalka lasku vyöhyke.
Vaahtomuovipehmuste toimitetaan 4'x6′ paneeleina ja se on 2 1/8″ paksu. Pidä nämä mitat mielessäsi, kun mittaat pohjan pinta-alaa ja syvyyttä. Tämä on tärkeää tietää, kun asennat jalkakäytävän tai reunuksen viereen. Synteettisen ruohon korkeus vaihtelee (katso spec.sheet). Vaahtomuovialusta on läpäisevä, joten ylimääräisiä valmisteluja ei tarvita, jotta tuote valuu pystysuoraan.
Kun murskattu kiviaines on tiivistetty ja valmis PolyGreen Foam -tyynyjä varten, aseta ne asianmukaisesti. Pehmusteita ei saa saumata yhteen.
Hankkeen vaatimukset.
Asennuslisä:
Kun olet epävarma leikkikentän turvallisuudesta, tutustu kansallisten puistojen ja virkistysalueiden komitean (National Parks andRecreation Committee) asettamiin standardeihin varmistaaksesi, että rakennat sääntöjen mukaisesti. Voit myös turvautua sertifioituun leikkikenttäturvallisuustarkastajaan (CPSl), joka auttaa sinua määrittämään hankkeesi erityisvaatimukset.

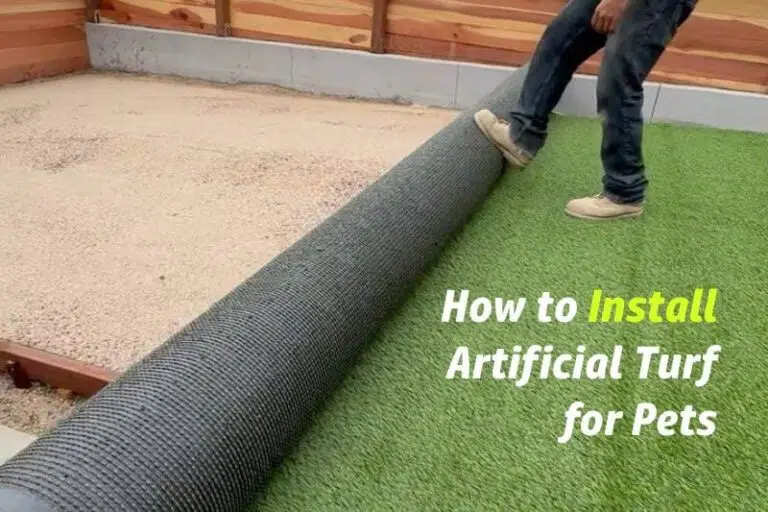
5. Aseta tekonurmi paikalleen.
Ennen kuin asetat rullat alustalle, varmista, että määrität, mihin suuntaan "vilja" kulkee (vilja on suunta, johon kuidut asettuvat). On tavallista, että vilja kallistuu kohti näkyvintä näköalapaikkaa. Nurmi näyttää aina paremmalta, kun kuidut osoittavat sinua kohti kuin poispäin.
Aloita yhdestä päästä ja aseta jokainen rulla paikalleen (oikeaan suuntaan) varmistaen, että jokainen rulla tulee yhteen ja muodostaa oman saumansa. Muista, että sinulla voi olla yksi tai useampia leikattavia kohteita, kuten puita, kiviä, leikkikentän pylväitä jne. Ensimmäinen tavoite turpeen asettelussa on saada molemmat rullat, jotka luovat sauman, mahdollisimman lähelle toisiaan. Sitten jos on esteitä (puita, kiviä, pylväitä jne.), haluat leikata ylimääräisen sauman (tai saumat), jotta turve makaa tasaisesti. On suositeltavaa leikata tällaiset "ylimääräiset saumat" mahdollisimman pienellä etäisyydellä turpeen reunasta (olipa se sitten sauman reuna tai turpeen ulkoreuna.).
Kun olet asettanut jokaisen rullan tasaiseksi, olet nyt valmis leikkaamaan sauman.

6.Cut sauma(t) tekonurmella asennus
Saumaus voidaan tehdä kahdella eri tavalla valitsemastasi turpeesta riippuen. Joissakin tuotteissa on uretaanipinnoitettu selkä, kun taas toisissa on kiinnitetty tyyny. Tyypillisesti uretaanipintaisen selän saumat leikataan takaa ja vaahtomuovisen selän saumat ylhäältä.
6-1 Uretaanipohjaisen turpeen saumaus

Kun scrim tukena turvetta kaikki mitä sinun tarvitsee tehdä, on leikata rivi tai kanava" seurata toisesta päästä rulla toiseen. Tarkoitamme "kanavalla" aluetta, joka on luotu turpeen takaosaan kahden tuftatun rivin väliin. Haluat valita kanavan noin 3-5 tufteririviä sisäänpäin turpeen reunasta. Kun olet valinnut kanavan, käytä pehmusteiden selkäleikkuria, aloita toisesta päästä ja seuraa kanavaa turpeen toiseen päähän. Hyvän sauman aikaansaamiseksi on erittäin tärkeää, ettei uusi kanava ylity. Jos satut ylittämään kanavan, aloita yksinkertaisesti uudesta kanavasta.
6-2 Saumaus vaahtomuovilla tuettu turve

Vaahtomuovipintainen tuote peittää kanavat, jotka näkyvät normaalisti takaa. Siksi sinun on leikattava ylhäältäpäin.
Ylhäältä leikkaamiseen tarvitset pari työkalua. . ensimmäinen työkalu tarvitset rivinhakulaitteen (an nuija tai litteä ruuvimeisseli toimii hyvin.). Työnnä rivinhakulaitetta eteenpäin häiritäksesi kuituja ja luodaksesi visuaalisen linjan, jota voit seurata (työntämällä yhteen suuntaan verrattuna toiseen saat paremman visuaalisen kuvan... joten tarkista ennen kuin aloitat leikkaamisen). Kun olet työntänyt rivinetsijän koko " kanavan" läpi, ota tyynyn selkäleikkuri ja leikkaa sauma.
Hyvä tapa leikata ylhäältäpäin on leikata käytä rivileikkuria pari kertaa. Liu'uta leikkuria. Pudota terä ja leikkaa sitten.
7.Saumojen asettaminen ja liimaaminen ruohon asennuksissa
Kun olet leikannut kaikki saumat... säädä jokaista rullaa varmistaaksesi, että reunat istuvat kunnolla yhteen. Toinen puoli voi koskettaa toista, mutta et halua päällekkäisiä reunoja tai pakottaa kahta reunaa yhteen niin, että ne muodostavat ylösalaisin olevan "V:n". Ihannetapauksessa haluat varmistaa, että sauman reunat ovat korkeintaan 1/8 tuuman päässä toisistaan.
Huom:
Sauman pitäisi näyttää hyvältä ennen liimausta. Käytä saumarullaa ja/tai luuta kuitujen pörräämiseksi ja manipuloimiseksi, jotta saat paremman käsityksen siitä, miltä sauma näyttää. Älä koskaan luota siihen, että täyte auttaa peittämään sauman.
Yhteistyöhaluttoman sauman säätäminen...!
Mitä teet, kun sauma ei tule kunnolla yhteen...? Sauma ei vain näytä hyvältä... vaikka leikkasit saumat juuri oikein. Saatat väistämättä törmätä tilanteeseen, jossa joissakin kohdissa on aukko ja toisissa päällekkäin. Päällekkäisyys on parempi kuin aukko, koska voit leikata päällekkäisen reunan. Jos kuitenkin joudut tilanteeseen, jossa osa saumasta on aukkoinen, tee vain toimenpiteet päällekkäisyyden luomiseksi kyseiselle alueelle. Katso seuraavalla sivulla oleva kaavio ONE havainnollistaa asiaa.

Kaavio 1:

Jos huomaat, että 2 saumausreunan välissä on rako, jota ei voida hyväksyä. Määritä hyvä ja huono puoli.

Luo "merkkejä, joita ei voida hyväksyä". Käytä tätä varten jalkakäytävän liitua ja tee viivoja tai merkkejä sauman poikki siihen kohtaan, jossa ei-hyväksyttävä aukko (aukot) alkaa ja päättyy. Käännä sauman reuna ympäri ja siirrä nämä merkit taustalevylle.

Luo "uudelleenleikkausnumero". Tällaisen numeron luomiseksi... mittaa raon leveys likimääräisinä riveinä ja lisää sitten 4 riviä tähän numeroon. Jos esimerkiksi suurin rako on noin 2 riviä... uudelleenleikkauslukusi on 6.

Ota "uudelleenleikkausnumerosi" ja laske niin monta tuftattua riviä sauman reunasta sisäänpäin ja leikkaa uudelleen. Aloita toiselta puolelta ja leikkaa "hyväksymättömään merkkiin" asti. Kun olet merkin kohdalla, leikkaa 90 astetta kohti sauman reunaa turpeen poistamiseksi, Toista prosessi sauman reunan vastakkaiselle puolelle. Tässä vaiheessa olet nyt luonut "välilehden".

Vedä huono puoli hyvälle puolelle ja leikkaa päällekkäinen "kieleke", jonka olet luonut.

Nyt sauman pitäisi olla täydellinen...!
Kun saumasi makaa juuri oikein... olet nyt valmis liimaamaan sauman.
Aluksi, vedä toinen reuna taaksepäin. Sitten kevyesti raaputa pohjaa pitkin makaavan reunan kahta päätä.. Haluat raaputtaa kevyesti vain makaavan reunan kahdessa kulmassa... ei keskellä saumaa).Näiden merkkien tarkoitus on toimia oppaina saumausliinan keskittämisessä. Kun merkit on tehty... käännä toinen makuuasennossa oleva reuna ylösalaisin. Haluat kääntää kummankin puolen noin 2,5 jalkaa kumpikinTämän pitäisi antaa sinulle runsaasti tilaa asettaa saumakangas ja kiinnittää siihen liimaa.
Kun vedät toisen reunan takaisin, haluat tehdä keskitä saumausliina kahta kevyesti muotoiltua merkkiä pitkin, jotka olet luonut pohjaan.
Kun kangas on keskitetty... varmista, että kangas ei liiku. Et halua kankaan liikkuvan äkillisen tuulen tai liimauksen aikana. Voit tehdä tämän yksinkertaisesti asettamalla nauloja saumauskankaan molempiin päihin sekä joitakin nauloja satunnaisesti keskelle. Joka 10′-15′:n välein pitäisi riittää. Nopea muistutus... varmista, että kun asetat nauloja, et lyö pohjaa lommolle...!
Kun saumauskangas on keskitetty ja kiinnitetty... levitä liimaa. 1/8″x1/8″ "V-kolmio" tai "U-kolmio" lastaa käytetään yleensä useimpien nykyisten synteettisten turpeen liimojen kanssa. Käytä kuitenkin liiman valmistajan suosittelemaa lastan kokoa. Jos käytät liian isoa lastaa, on vaarana, että saumakangas saa liikaa liimaa, joka voi tihkua sauman reunojen väliin ja kasata kuidut yhteen, jolloin sauma ei ole täydellinen.
Kun olet saanut liiman asennuksen valmiiksi, olet nyt valmis tekemään seuraavat toimet aseta turpeen reunat liiman päälle ja sulje sauma.. Varmista ennen sauman sulkemista, että jokaisen sauman reunan ja saumakankaan taustapuoli on puhdas kaikista roskista ja että liima on lähtenyt kunnolla. ("Välähdys" tarkoittaa aikaa, jonka liima tarvitsee liimautuakseen kunnolla.)
Koska saatavilla on monenlaisia liimoja, on parasta tarkistaa liiman valmistajalta, mikä on suositeltava välähdysaika ja käytettävän lastan koko.
Hyvä tapa asettaa turve takaisin alas on ensin tutkia "kuitujen asettelua" suhteessa saumaan.Tyypillisesti sauman toisella puolella kuidut kallistuvat saumasta poispäin ja toisella puolella ne haluavat kallistua saumaa kohti. Haluat asentaa ensin sen puolen, jonka kuidut ovat poispäin saumasta.. Aseta sitten toinen puoli alas. Näin varmistat, että toista puolta asettaessasi et jää kiinni tai työnnä kuituja liimaan.
Jos törmäät tilanteeseen, jossa molemmat reunat kallistuvat saumaa kohti... on parasta asentaa molemmat reunat samaan aikaan. Aloita toisesta päästä ja etene kohti toista päätä tuomalla molemmat reunat yhteen kuin vetoketju.
Kun olet asettanut sauman molemmat puolet liiman päälle... Käytä saumarullaa koko sauman pituudelta. Saumarulla ei ainoastaan auta manipuloimaan kuituja, jotta sauma peittyy paremmin, vaan myös auttaa työntämään turvetta liimaan.
On myös suositeltavaa käyttää raskasta telaa (kuten vedellä täytettyä nurmikkotelaa tai raskasta 75-100-kiloista vinyylilattiatelaa) sauman varrella. Tämä auttaa työntämään turvetta liimaan vahvan sidoksen varmistamiseksi.Jos sinulla ei ole käytettävissänne raskasta telaa (ei kaksoisrumpurullaa), varmista, että kävelet (vauvan askelin!) koko saumaa pitkin, jotta painosi antaa tarvittavan paineen hyvän sidoksen varmistamiseksi.
Tässä vaiheessa ei ole huono idea lyödä nauloja sauman molemmin puolin. Yhden joka 6″-18″ välein kummallakin puolella pitäisi riittää pitämään sauman tiiviinä ja minimoimaan liikkeet saumassa... Ajattele tätä vaihetta "saumavakuutuksena"...! (Huomaa, että tekisit tämän vain silloin, kun turve istuu suoraan aggregaattipohjan päällä. Älä käytä nauloja pitkin saumaa, kun turve istuu leikkikenttäalustan päällä).
Asennuslisä:
Jos sinulla on 3 tai useampia rullia, jotka saumataan yhteen, on hyvä käytäntö, että kun olet saumannut rullat #1 ja #2 yhteen, potkaiset kevyesti rullaa #2 rullan #3 suuntaan varmistaaksesi, että rulla #2 on venytetty kunnolla ennen saumausta. Näin minimoidaan mahdolliset kuplat turpeessa.
8. Leikkaa reuna-alueen reuna tekonurmelle
Kun saumat on asennettu, KAIKKI turvetta olisi potkitaan (tai teho harjaamalla yhteen suuntaan) hieman venyttää turvetta ennen leikkaamista ja kiinnittämistä kehä reuna.
Käytä mattoveitsiä reunan leikkaamiseen. Jos työskentelet avoimella alueella, jota ei ole rajattu kiviseinällä, aidalla jne., suosittelemme käyttämään jalkakäytävän liitua piirtämään reuna-alueen reunan päälle turvetta ennen kuin leikkaat turvetta. Kun olet tyytyväinen piirtämääsi muotoon, seuraa linjaasi ja leikkaa.
Ulkoreunan leikkaamiseen (avoimessa tilassa) suosittelemme punaista silmukkaleikkuria. Sinun on työnnettävä eteenpäin tätä veistä käyttäen, ja näin voit leikata hallitummin luomasi linjan mukaisesti. Huomaa, että saatat joutua vaihtamaan terää kourallisen kertaa leikataksesi lopullisen muodon, koska terä epäilemättä tylsistyy.
Kun olet leikannut lopullisen muodon... siirry eteenpäin ja poista turpeen jäänteet.

9.Secure reuna reuna tekonurmi
On olemassa muutamia tapoja turvata turvetta, Tässä on muutamia lähestymistapoja:
9-1 Naulat ulkoreunan suuntaiset naulat

Käytä 6 tuuman nauloja. Suosittelemme naulan sijoittamista noin ½" - 1" etäisyydelle reunasta ja 6 "-12" välein ympäri kehääKun törmäät saumaan, on suositeltavaa sijoittaa 2 naulaa kumpaankin nurkkaan... yksi lähimpänä nurkkaa ja toinen kohti sauman keskikohtaa. Näin saat 4 naulaa kunkin sauman päähän.
Lisätty huomautus:
Kun lyöt naulaa paikalleen... napauta naulaa, kunnes naulan pää tulee juuri ja juuri kuitujen kärkien alapuolelle... harjaa sitten kuituja kädelläsi suoristaaksesi ne... vasaroi sitten naulaa hieman lisää... harjaa kuituja vielä kerran ja vasaroi sitten vielä kerran. Tämän vaiheen pitäisi auttaa varmistamaan, että mahdollisimman vähän kuituja jää kiinni naulan pään alle.
9-2 Ympärysnaulauslevyt

Käyttämällä painekyllästettyä puutavaraa (2x4) "naulauslaudan" luomiseksi saadaan vahva ja varma reuna. Tämä edellyttää etukäteissuunnittelua, sillä naulauslaudat on asennettava ennen pohjaa. Ne voidaan kiinnittää: Kun ne on asennettu, kiinnitä turve sinkityillä niiteillä 3″-5″ välein naulauslaudan suuntaisesti.
Asennuslisä:
Voit leikata turvetta reunaan naulain hallituksen tai jättää hieman ylihangon sitten kääri ja niitti turvetta osaksi takapuolelle naulain hallituksen
9-3 Rikkaruohokangas ja puutavaranaulat
Yhdistämällä kaupallisen rikkaruoholiinan ja 6 tuuman puutavaranaulojen käyttö voidaan saada aikaan vahva ja turvallinen reuna. Ota 3′ tai 4' leveä rulla kaupallista rikkaruohokangasta ja aseta puolet (leveydestä) tasaisesti reunan alle. Leikkaa kangas tarpeen mukaan pituuteen. Kun ensimmäinen puolisko on asettunut mukavasti turpeen alle.... haudata toinen puoli rikkaruohokangasta viereisen maisemoinnin alle. (nurmikko, kivi, paljon jne.) Kun molemmat puolet istuvat mukavasti... kiinnitä rikkaruohokangas nurmikon alapuolelle. Kun olet liimannut toisen puoliskon turpeeseen, käytä 6″ puutavaranauloja ulkoreunaa pitkin. Katso lisätietoja naulan käytöstä kohdasta 9-1.
10.Top-dress turvetta asianmukainen täyte. (Jos tarpeen.)
Ennen pintakäsittelyaineen levittämistä tai "infill" levittämistä kannattaa harjailla kuituja ("viljaa vasten"), jotta ne pysyvät mahdollisimman hyvin pystyssä. Levitä sitten pieni määrä täytettä tasaisesti pisaranlevittimellä. (Hiekkatäytteen levityksessä haluat levittää kerralla noin 1 - enintään 1,25 kiloa neliöjalkaa kohti.) Liian suuri määrä kerralla murskaa kuidut, jolloin syntyy hajanaisia kohtia kaikkialla. Nämä hajanaiset kohdat luovat lopputuloksesta vähemmän ihanteellisen näköisen. Jos sinulla on hajanaisia alueita, voit käyttää lehtipuhallinta hajottaaksesi osan ylimääräisestä täytteestä tasaisemmaksi.
Kun olet asentanut täytteen oikean määrän. Olet valmis siivoamaan.
11.Clean up ja nauttia eduista
Ennen pintakäsittelyn tai "täydennysrakentamisen" aloittamista kannattaa harjailla kuituja ("viljaa vasten"), jotta ne pysyvät mahdollisimman hyvin pystyssä. Levitä sitten pieni määrä täytettä tasaisesti pisaranlevittimellä. (Hiekkatäytteen levityksessä haluat levittää kerralla noin 1 - enintään 1,25 kiloa neliöjalkaa kohti.) Liian suuri määrä kerralla murskaa kuidut, jolloin syntyy laikukkaita kohtia kaikkialla. Nämä hajanaiset kohdat luovat lopputuloksesta vähemmän ihanteellisen näköisen. Jos sinulla on hajanaisia alueita, voit käyttää lehtipuhallinta hajottaaksesi osan ylimääräisestä täytteestä tasaisemmaksi.
Johtopäätökset: Nauti täydellisesti asennettu tekonurmi nurmikko
Tekonurmen asentaminen on käytännöllinen tapa luoda vähän huoltoa vaativa, vihreä ja pitkäikäinen ulkotila. Alustan valmistelusta nurmikon kiinnittämiseen ja harjaamiseen, jokainen vaihe on ratkaisevan tärkeä tasaisen ja luonnollisen näköisen lopputuloksen saavuttamisessa. Olipa kyseessä takapihan, urheilualueen tai kaupallisen maiseman päivittäminen tekonurmen asentamiseksi, asianmukainen asennus varmistaa, että tekonurmi pysyy kauniina ja kestävänä vuosia. Jos haluat ammattimaista tekonurmen asennuspalveluiden opastusta tai ensiluokkaista tekonurmea, yhteistyö kokeneen valmistajan, kuten MightyGrassin, kanssa voi auttaa sinua saavuttamaan virheettömän lopputuloksen alusta loppuun.
Miten asentaa synteettinen ruoho videoita:
Hanki selkeä, vaiheittainen yleiskatsaus tekonurmi asennusprosessi, valmisteluista pohja ja tehdyn turvetta turvaamaan saumat ja lisäämällä täydennysrakentamisen. Tämä video (peräisin NAMGRASS) esittelee keskeiset työkalut, materiaalit ja tekniikat, joita tarvitset sujuvan ja ammattimaisen lopputuloksen aikaansaamiseksi. Olipa kyseessä urheilukenttä, takapihan viheriö tai parveken nurmikko, seuraa MightyGrass-asiantuntijoiden ohjeita varmistaaksesi, että asennus on täydellinen joka kerta.
FAQ: Tekonurmi asennus: Kaikki mitä sinun tarvitsee tietää tekonurmi asennuksesta.
Mikä on prosessi urheilunurmi asennus?
Urheilu turve asennus sisältää useita vaiheita, jotka ovat pitkälti samanlaisia kuin tekonurmi asennusprosessi edellä kuvattu, mukaan lukien kentän valmistelu, salaojitus subbase rakentaminen, turve munivia, täydennysrakentamisen levitys, ja merkintä. On suositeltavaa lisätä iskuja vaimentava kerros tekonurmen ja alustan väliin. Oikein tasoitetulla täytöllä varmistetaan pelaajien turvallisuus ja pallon tasainen kulku koko kentällä.
Miten asennat takapihan viheriön?
Rakentaa takapihalla viheriö, aloittaa luomalla tiivistetty pohja, asentaa rikkaruohot este, sitten asettaa ja varmistaa turvetta. Valitse puttausviheriön turvetta, jossa on lyhyt, tiheä kasa, jotta pallo rullaa realistisesti. Voit lisätä ääriviivoja tai useita reikiä räätälöidympää kokemusta varten.
Voiko tekonurmi asentaa parvekkeelle?
Kyllä. Parveken nurmikon asennus on yksinkertaista ja kevyttä. Tarvitset vain puhtaan, tasaisen pinnan, jossa on riittävä salaojitus. Täyttämätön maisematurve tai lukittuvat turvelaatat sopivat erinomaisesti pienille alueille ja helppoon DIY-asennukseen.
Mikä on maisema tekonurmella käytetään?
Maisema tekonurmi on ihanteellinen asuinalueiden nurmikot, puutarhat, leikkikentät, ja kaupalliset ulkoalueet. Se tarjoaa luonnollisen ulkonäön minimaalisella huollolla - kastelua, niittoa tai lannoitusta ei tarvita.
Mistä voin ostaa tekonurmi materiaaleja?
Löydät premium tekonurmella materiaaleja, mukaan lukien turvetta rullia, täyte hiekka, isku tyynyt, ja liimat-ammattimainen tekonurmella myymälä tai suoraan valmistajilta kuten MightyGrass, joka tarjoaa sekä irtotavarana tarjonta ja räätälöityjä pakkauksia hankkeisiin ja jakelijat.
Mitkä ovat tärkeimmät materiaalit, joita käytetään tekonurmella?
Tekonurmi on tyypillisesti valmistettu PE (polyeteeni), PP (polypropeeni), tai nailon langat, tukena lateksi tai PU-pinnoite. MightyGrass sisältää myös korkealaatuisia funktionaalisia masterbatch-materiaaleja, joilla varmistetaan kestävyys, pehmeys, UV-kestävyys ja pitkäaikainen värin pysyvyys.
Kuinka paljon tekonurmi asennus maksaa?
Tekonurmi asennuskustannukset vaihtelevat riippuen alueen koosta, pohjan valmistelu, turvetta tyyppi, ja täytteen materiaalit. Asuinalueiden nurmikoilla tai viheriöillä hinnat vaihtelevat yleensä välillä $5-$15 neliöjalkaa kohti, kun taas urheilunurmi hankkeet voivat maksaa enemmän erikoistuneen pohjan ja salaojitusjärjestelmien vuoksi.
Kannattaako palkata ammattilaisia nurmikon asennukseen?
Kyllä, erityisesti suurissa tai urheilusovelluksissa. Ammattitaitoiset asentajat varmistavat asianmukaisen salaojituksen, tasaiset saumat ja turvalliset reunat - se pidentää nurmikon käyttöikää ja ulkonäköä. Pienemmissä DIY-hankkeissa, kuten parvekkeilla tai takapihoilla, voit noudattaa yksinkertaisia asennusvaiheita perustyökaluilla.