
If you are planning or bidding on a playground project, you will find that the industry’s focus has quietly shifted. Your clients are no longer concerned solely with aesthetic design, they have begun to rigorously scrutinize key elements involved in the playground turf installation, such as safety compliance, long-term durability, and total lifecycle costs.
This is exactly why playground turf systems are rapidly replacing natural grass, rubber mulch, and even poured-in-place rubber across schools, parks, and commercial play areas. A properly installed artificial grass playground surface gives you a cleaner, more consistent, and all-weather solution that performs year-round.
Whether you are building a school playground, a municipal park, or a commercial artificial grass for play area, we aim to help you create a flooring system that excels in both technical performance and commercial value.
Why Proper Playground Turf Installation Matters More Than You Think
When you evaluate playground turf, it’s easy to focus on the surface itself—fiber quality, color, or price. But in real projects, performance is determined far more by how the system is installed than by the rumput tiruan alone. Even the best artificial grass for playground applications can fail prematurely if the foundation, drainage, and safety layers are not engineered correctly.
What Happens Beneath the Surface?
| Lapisan | Fungsi | Key Impact |
| Sub-base (compacted aggregate) | Kestabilan struktur | Prevents sinking & uneven surfaces |
| Sistem saliran | Water evacuation | Keeps outdoor playground turf usable year-round |
| Shock pad / E-layer | Penyerapan impak | Meets ASTM F1292 & EN1177 safety standards |
| Turf layer (synthetic fibers) | Play surface | Provides comfort, aesthetics & wear resistance |
In contrast, a properly executed playground turf installation can extend system lifespan to 8–10+ years, significantly reducing lifecycle playground turf costs.
Tools & Materials Checklist for Playground Turf Installation
Before beginning the playground artificial turf installation, please ensure that you have gathered all the necessary tools and materials to ensure the project proceeds smoothly and to avoid delays or rework.
| kategori | Materials / Tools | Function / Notes |
| Base Construction Materials | Crushed stone / road base | Forms a stable sub-base, prevents settling and deformation |
| Decomposed granite (optional) | Fine leveling layer for a smoother surface finish | |
| Geotextile fabric | Acts as a weed barrier and separates soil from base layer | |
| Turf & System Components | Playground turf rolls (PE fiber recommended) | Provides a soft, durable artificial grass playground surface |
| Shock pad (CFH-rated) | Critical for impact absorption and safety compliance (fall height protection) | |
| Infill material (optional) | Adds stability and cushioning in infill systems | |
| Installation Tools & Equipment | Plate compactor / roller | Ensures proper base compaction and long-term stability |
| Turf cutter / utility knives | Used for precise cutting and shaping of turf rolls | |
| Measuring tape & chalk lines | Ensures accurate layout and alignment during installation | |
| Power broom / stiff brushes | Helps lift turf fibers and evenly distribute infill | |
| Seaming & Fixing Materials | Pita jahitan | Connects turf sections securely at joints |
| Polyurethane (PU) adhesive | Provides strong, flexible bonding for seams | |
| Galvanized nails / spikes | Fixes turf edges and prevents movement | |
| Edge restraints (bender board / concrete curbing) | Maintains perimeter integrity and prevents edge lifting |
Having the right setup before you start doesn’t just improve efficiency—it directly impacts whether your artificial turf for playground surfacing will pass inspection and perform over time.
Step-by-Step Playground Turf Installation Process
A successful playground turf installation is less about speed and more about sequence. The construction of each structural layer impacts the subsequent one; minor deviations occurring during the initial stages often escalate later into issues such as failure to pass final acceptance, poor drainage, uneven surfaces, or a premature end to the playground’s service life.
We will now present a practical and effective installation procedure for artificial turf in playgrounds, which we hope will prove helpful in the implementation and optimization of projects across various settings—including schools, parks, and commercial recreational areas.
Step 1 – Playground Turf Base Preparation
Everything begins with removing what shouldn’t be there. Natural grass, roots, and organic soil all need to go, because they are unstable by nature. Over time, organic material decomposes, and that’s when you start seeing dips and soft spots in what should be a stable playground artificial turf surface.
Most projects require excavation in the range of 75–150 mm (3–6 inches), though deeper builds are common when higher fall protection is needed. At the same time, the site should be graded with a gentle 1–2% slope. Even though modern artificial grass for playgrounds drains well, water still needs direction. If your project lacks the necessary slope, the site’s drainage efficiency will be significantly reduced.
Step 2 – Install Geotextile Weed Barrier
Once the excavation for the playground artificial turf base is complete, laying a layer of geotextile creates an isolation layer between the soil and the structural foundation. It’s one of those steps that doesn’t show in the final result, but over time, this layer helps prevent weed intrusion through the fake grass for outdoor play area. While also stabilizing the base by keeping fine soil particles from migrating upward. Especially in long-term outdoor installations, this small detail protects the integrity of the entire system.
Step 3 – Build and Compact the Sub-Base
This is where the project starts to take shape structurally. The sub-base carries the load, controls drainage, and ultimately determines whether your outdoor playground turf feels solid underfoot or not.
Typically, crushed stone or road base is installed in layers and compacted progressively. Each layer is usually kept around 50 mm (2 inches) to ensure proper compaction. We recommend compacting it to between 90% and 95%, which is the standard followed by most professional installation projects.
If this step is rushed, problems don’t appear immediately—but they will. You’ll see uneven wear patterns, surface movement, and in some cases, water collecting beneath the artificial turf for playground surfacing. A properly compacted base, on the other hand, supports drainage rates that can exceed 500 mm/hour, keeping the surface usable even after heavy rain.
Step 4 – Install Shock Pad
The shock pad is what allows your synthetic turf safety surfacing system to meet impact standards.
Most playground systems use pads between 20 mm and 50 mm thick, depending on the required Critical Fall Height (CFH). The consistency of the shock-absorbing pads is worth noting. The pads need to sit tightly together, without gaps or height differences, because even small inconsistencies can affect impact performance during testing.
When artificial turf and pad hentakan are designed to work together, you reduce uncertainty and make compliance much easier to achieve.
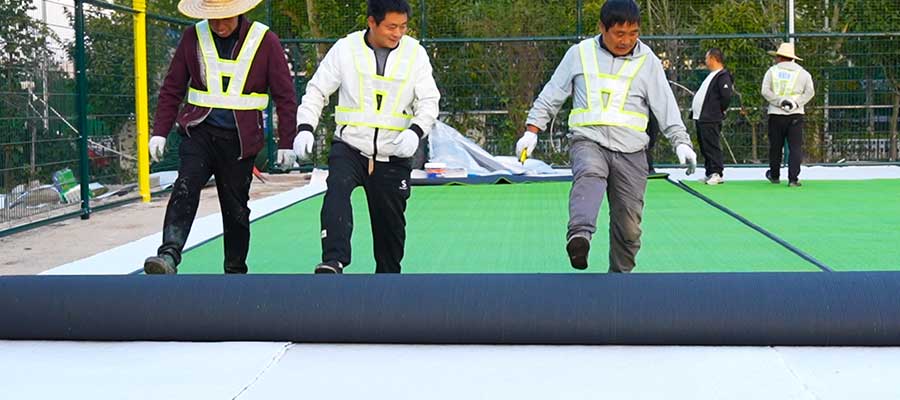
Step 5 – Lay and Position Turf Rolls
Before fixing anything in place, the artificial grass should be laid out and allowed to adjust to site conditions. Temperature can affect material dimensions slightly, and giving it time to settle helps avoid tension later.
When positioning the rolls, consistency matters. The grass fibers should all run in the same direction, otherwise the finished artificial grass playground surface will show visible shade differences. Seam planning also happens at this stage—keeping seams away from high-traffic zones like slide exits can significantly extend the life of the installation.
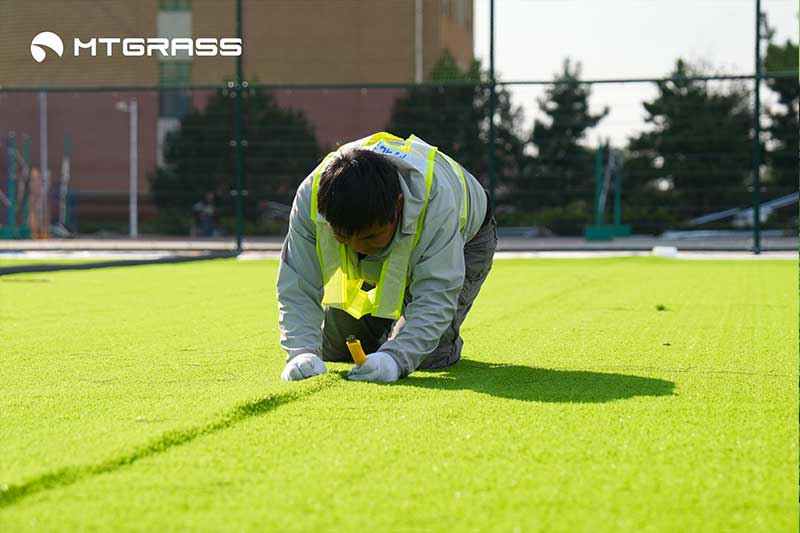
Step 6 – Cutting, Seaming & Joining Turf
This is where craftsmanship becomes visible. Clean cuts and well-executed seams are what separate a professional installation from an average one.
The process typically involves placing seam tape beneath the joint and applying a two-part polyurethane adhesive (Ingredients mixed at a ratio of 9:1) evenly before bringing the edges together. Once pressed into place, the seam should be both strong and visually subtle.
We recommend that you set aside 12–24 hours for adhesive to set properly ensures that seams hold under repeated use, which is especially important in busy playground turf environments.
Step 7 – Secure the Turf Edges
Artificial turf edges are where movement begins if they are not properly fixed. Over time, temperature changes and usage can cause expansion and slight shifts, particularly in outdoor playground turf installations.
Securing the perimeter—whether through spikes, nails, or attachment to a solid edge like concrete—locks the system in place. A well-secured turf edge prevents lifting, reduces trip hazards, and maintains a clean finish over time.
Step 8 – Infill Application (If Applicable)
Depending on the system design, infill may or may not be used. Typically, outdoor playground turf may involve infill, which serves primarily an auxiliary function rather than a structural one.
Infill materials such as silica sand help stabilize the turf backing and keep fibers upright, contributing to a more natural feel underfoot. The application needs to be even, followed by brushing to work the material into the fibers.
Many artificial grass for play areas used in recreational areas—such as schools, kindergartens, and indoor facilities—are increasingly shifting toward “Non-infill” systems. Non-Infill artificial turf (such as that offered by MightyGrass) is easier to clean, offers superior hygiene, and helps minimize long-term maintenance concerns.
Step 9 – Incorporating Playground Features
If your playground features equipment such as slides, swings, or climbing frames, meticulous planning during the installation process is essential. Precision is paramount when working around these structures. The artificial turf must be cut with exacting precision to fit snugly against support posts and the edges of base plates, while the underlying shock-absorbing pads must remain continuous and uninterrupted throughout the designated fall-cushioning zones. Areas such as slide exits often endure high-impact forces and may, therefore, require additional reinforcement.
Remember that the artificial turf should be cut to conform precisely to the contours of the various pieces of equipment, ensuring it remains free of wrinkles or uneven surfaces. Paying close attention to these details is key to maintaining a playground that is both tidy and safe. At this stage, the primary focus lies less on rigidly adhering to standardized procedures and more on flexibly adapting the turf installation plan to suit the specific, real-world conditions of the playground site.
Step 10 – Final Grooming & Inspection
The final stage is where everything comes together. The surface is brushed to lift the fibers, seams are checked, edges are reviewed, and the overall flatness of the area is assessed.
At this point, the artificial turf for playground surfacing should feel uniform and stable across the entire area. Water should drain quickly, seams should be barely noticeable, and transitions between sections should be smooth.
On higher-spec projects, contractors may also verify impact performance or conduct a final compliance review before handover.
Maintenance Tips: Keeping Playground Turf in Top Condition
Compared to natural grass, the maintenance of artificial turf in playgrounds is relatively simple. However, regular cleaning and care help ensure it remains in optimal condition for years to come.
Regularly brush the turf to keep the grass fibers standing upright and to remove accumulated dirt and debris. Use a leaf blower to clear the turf surface, particularly during the autumn season when fallen leaves and twigs are more abundant.
Periodically inspect the turf for signs of wear and tear, especially in high-traffic areas or beneath playground equipment. Perform spot cleaning as needed, and if any seams become loose, repair them immediately to ensure the turf remains both safe and aesthetically pleasing.
Why You Choose MightyGrass for Your Playground Turf Project
Choosing the right partner can make a measurable difference in both project delivery and long-term results.
- Dengan MightyGrass, you are not just sourcing artificial grass for playgrounds—you are working with a manufacturer that understands how systems perform in real-world conditions.
- Because MightyGrass controls the full production process—from yarn extrusion to backing—you get a level of consistency that is difficult to achieve when sourcing from multiple suppliers. This becomes especially important in synthetic turf safety surfacing, where small variations can affect performance.
- For contractors in North America, the presence of a California warehouse also changes the equation. It means faster delivery, reduced lead times, and the ability to respond quickly to project schedules without long international shipping delays.
- MightyGrass supports you beyond product supply. Instead of leaving you to figure out specifications on your own, the team provides system-based recommendations tailored to your project.
Whether you are working on a school playground, a municipal park, or a commercial artificial grass play area, we can provide you with a configuration solution that ensures the installation results fully comply with all safety regulations.
Tell us your project details, and we’ll help you build it right the first time. Get a playground turf system with truly exceptional performance—instantly.
Kesimpulan
Installing playground turf is no longer just a construction task—it is a combination of engineering, safety compliance, and long-term performance planning.
From base preparation to final inspection, every step in the playground artificial turf installation process contributes to the outcome. When done correctly, the result is a surface that is safe, durable, and ready to handle years of continuous use. When done poorly, even the highest-quality materials can fail prematurely.
That’s why more contractors are shifting toward system-based solutions, where design, materials, and installation work together from the beginning.
Soalan Lazim
How Long Does Playground Turf Installation Take?
One of the advantages of artificial turf for playground surfacing is predictable installation timelines. Unlike poured rubber or natural grass, turf systems are less dependent on curing time or weather windows.
For most projects, timelines follow a fairly consistent pattern.
A small school or daycare playground (under 3,000 sq ft) can often be completed within 2–4 days, assuming the site is already prepared and weather conditions are stable. Medium-sized projects, such as community parks or larger schoolyards, typically take 5–7 days from excavation to final inspection. Larger or more complex installations—especially those involving multiple play zones or custom designs—may extend beyond a week.
What influences your timeline the most is not the turf itself, but the groundwork:
- site conditions and excavation difficulty
- base construction and compaction time
- complexity of playground equipment integration
Weather can also play a role, particularly during base preparation and adhesive curing stages.
In general, compared to traditional safety surfacing methods, playground turf installation offers a faster return to use. Many systems can be opened to traffic within 24–48 hours after completion, which is a major advantage for schools and public facilities operating on tight schedules.
How to Prevent Water Accumulation on Playground Turf?
Effective drainage is a key factor in ensuring the longevity of playground turf. Poor drainage can lead to water pooling on the surface, which in turn causes the turf to remain damp, encourages mold growth, and may even result in unpleasant odors. To prevent this, it is essential to install a high-quality base layer, as this facilitates the smooth drainage of moisture away from the turf surface.
If you reside in a region with heavy rainfall, installing turf equipped with drainage holes is particularly important. These drainage holes allow rainwater to permeate into the base layer beneath the turf, thereby preventing water from pooling on the surface. Furthermore, when installing the base layer, the natural slope of the ground should be taken into account to ensure that excess water is channeled toward designated drainage points, such as trenches or drainage pipes.
Maintaining effective drainage requires regular inspections of the turf to remove any debris that could potentially clog the drainage holes. Periodically raking or brushing the turf helps keep drainage channels clear, allowing water to flow freely. Diligently checking the turf surface for signs of standing water can significantly extend the lifespan of the turf and ensure the play area remains safe and dry.
How to Extend the Lifespan of Playground Turf?
To ensure playground turf performs at its best, regular care and maintenance are essential for preserving its aesthetic appeal and overall condition. One of the simplest ways to extend the lifespan of the turf is through regular brushing. Brushing helps keep the turf fibers standing upright, preventing them from becoming matted or flattened in high-traffic areas.
Additionally, it is crucial to regularly clean the turf to remove dirt, fallen leaves, and other debris. This can be accomplished using a leaf blower, a broom, or even a garden hose. Keeping the lawn surface clean and free of organic matter helps prevent the growth of mold, which degrades the quality of the lawn.


