Skifter du til kunstgræs i 2025? Det er et smart træk, især hvis du står for et område med meget trafik eller et stort landskabsprojekt. Men uanset størrelsen gør en korrekt installation hele forskellen. Derfor har vi sammensat denne omfattende, opdaterede guide, der hjælper dig med at gøre det rigtigt fra starten.
PS: Som professionel Producent og leverandør af kunstgræsMightyGrass har støttet hundredvis af vellykkede installationer på tværs af sport, bolig, erhverv og offentlige rum. Vores kunstgræs er konstrueret til holdbarhed, dræning og et naturligt udseende, der holder.
Hvis du har yderligere spørgsmål, kommentarer eller bekymringer, er du velkommen til at kontakte MightyGrass professionelt team.
1. Værktøj og materialer til installation af kunstgræs
Værktøj til installation af græs (nødvendigt og/eller anbefalet).
Skovl
Hammer
Fortov Chal
Kost med medium til stive børster eller Power-Broom

Dråbespreder (IKKE en bredspreder)

Græsskærer (hvis der er brug for dette værktøj, er der to valgmuligheder: enkeltaksel eller dobbeltaksel. Den dobbeltakslede er lidt lettere at håndtere).

Landscaping Rake (fantastisk til at finjustere din base.)

Rive til gårdsplads eller have. (God til generel fordeling af tilslagsmaterialer).

Pladekomprimator og/eller Ride-on dobbelttromle med glatte hjul

Brugskniv eller tæppekniv med 2-sidet blad. (De samme blade kan bruges til puderygskæren og i løbegangskæren).

Cushion-back Cutter (godt værktøj at have til at skære sømme.)

Red Loop-pile Cutter (fantastisk til at skære den ydre form af din putting green).

Tæppesaks og/eller andenæbssaks (andenæbssaksen har et forskudt håndtag).

Rækkefinder | Ahle eller flad skruetrækker. (Begge disse værktøjer fungerer godt til at finde rækkerne i græsset).

Sømrulle

Trillebør eller Bobcat med glat skovl.

Screen-rake eller slæbenet (ikke en nødvendighed, men et godt værktøj til de sidste detaljer på basen...!)

Tung rulle til falsning (75-100LBS. vinylgulvrulle eller håndrulle)

Løvblæser (rygsæk eller håndholdt)

Installation af kunstgræsmaterialer
| Ukrudtsdræber | Markeringsflag |
|---|---|
| Træpæle | Markafmærkningsmaling |
| Knust tilslag | Syntetisk græs |
| Klæbemiddel | Klud til sømning |
| Negle | Udfyldningsmateriale |
2. Udlæg området før installation af syntetisk græs
Afhængigt af dit projekt er dit område måske allerede afgrænset af forskellige objekter eller landskabelige elementer, f.eks. en hæk, en stenmur, et bed, et hegn eller endda et hus.
Men hvis dit område ikke er defineret, er det altid bedst at male græsstykket eller -stykkerne på jorden for at identificere, hvor hvert hjørne og hver side af hvert stykke græs skal være. For at gøre dette skal du bruge en kombination af markeringsflag (eller pæle) sammen med markeringsmaling til at identificere kunstgræskanterne.
Sørg for at arbejde i parallelle linjer og lav 90-graders vinkler, hvor dit design kræver det. Når du har markeret dine hjørner og kanter på jorden ... kan du sprøjtemale omkredsen af dit planlagte område.

3. Fjern græstørv og forbered underlaget før installation af kunstgræs
ADVARSEL ... SØRG FOR, AT DU VED, HVOR DER ER STRØM- ELLER VANDLEDNINGER, FØR DU BEGYNDER AT GRAVE NED, ISÆR MED MEKANISKE MIDLER. (Det anbefales, at du kontakter de lokale myndigheder og beder dem om at markere eventuelle underjordiske ledninger. Det er normalt gratis og hjælper med at beskytte dig mod ethvert ansvar, hvis du rammer en ledning).
Når du har sikret dig, at der ikke er vand- eller elledninger i vejen ... kan du gå i gang med at fjerne græstørven. En græstørvsklipper er at foretrække til denne opgave og gør arbejdet meget hurtigere og nemmere. Når du bruger græstørvsklipperen, skal du starte med at klippe langs den omkredslinje, du har lavet. Når du har kørt rundt om området, kan du fjerne resten af græstørven. Når al græstørven er fjernet, er det tid til at grave underlaget ud. Sørg for at fjerne nok til at give den rette dybde til underlaget. (Læs trin #4 for at få mere at vide om underlagets tykkelse og installation).
Installation ekstra:
Afhængigt af din geografiske placering er det en god idé at bruge ukrudtsmiddel på det ryddede område og/eller en græsblokeringsspray. Det vil hjælpe med at forhindre græs eller ukrudt i at vokse igennem dit kunstgræs (brug altid disse produkter i henhold til producentens anbefalinger).

4. Installer underlag til kunstgræs
Der er flere tilgange med en række forskellige produkter, der kan bruges, når man konstruerer et underlag til kunstgræs. I denne vejledning vil vi tale om det grundlæggende aggregatunderlag. Læs trin #9 for at få yderligere indsigt i, hvordan man bruger sømbræt langs kanten til at sikre græsset.
Brugen af forskellige tilslagsmaterialer vil give forskellige drænhastigheder. Hvis en hurtig drænhastighed er vigtig, anbefaler vi at bruge en 2-lags base bestående af "57 stone" (tykt bundlag - 75% af basetykkelsen) og "1/4-inch-minus" (tyndt toplag - 25% af basetykkelsen). Til et underlag, der ikke har brug for hurtig dræning, kan du nøjes med et system i ét lag med et '3/8″-minus' eller '1/4″-minus' produkt. Vi anbefaler, at du kontakter dit lokale stenbrud og fortæller dem, hvad du prøver at bygge. De bør være i stand til bedre at hjælpe dig med produktvalg og tykkelse.
Det ultimative mål med at skabe et underlag af kunstgræs er, at det forbliver stabilt i årevis, og at det færdige underlag er glat, så man ikke kan mærke eller se nogen uoverensstemmelser i underlaget gennem græsset.
Når du har fået fat i det rigtige grundmateriale, og din undergrund er klar, kan du komme i gang med at køre stenene ind, planere dem og komprimere dem.
Bemærk venligst:
Medbring IKKE mere materiale, end din komprimator kan klare. Hvis du bruger en pladekomprimator, foreslår vi, at du kun komprimerer et lag på tre tommer (3″) ad gangen. Hvis du bruger en dobbelt tromle, så spørg udlejningsfirmaet eller producenten om maskinens specifikationer/kapacitet.
Installation ekstra:
Hvis du bruger et "1/4-tommer-minus"-materiale (undertiden kaldet screeningsrester, finmateriale eller stenstøv), anbefaler vi, at du bruger en screeningsrive til at færdiggøre din base. Dette værktøj hjælper virkelig med at udjævne eventuelle mindre uoverensstemmelser i underlaget. Det er det samme værktøj, som bruges til at udjævne baseballbaner.
Tag dig god tid til at lægge underlaget. En glat overflade afgør, hvor godt græsset ser ud, når det er lagt (du kan ikke forvente en flot græsplæne uden et velkonstrueret underlag).
Legepladsspecifik installation:
En legepladsinstallation kan kræve et faldzoneområde under og omkring selve legeredskaberne. Dette er meget almindeligt og påkrævet i forbindelse med kommercielle eller kommunale projekter. PolyGreen Foam-polstring kan bruges under det syntetiske græs og oven på det knuste underlag for at skabe et sikkert og acceptabelt samlet legepladssystem.
Hvis du bruger en 2,125" PolyGreen Foam-pude under kunstgræs, får du en faldzone på 2,5 meter.
Hvis du bruger en 1,125″PolyGreen Foam-pude under græsset, får du en faldzone på 3 fod.
Skumpolstringen kommer i 4'x6'-paneler og er 2 1/8″ tyk. Husk disse mål, når du måler området og dybden af din base. Det er vigtigt at vide, når du installerer ved siden af et fortov eller en kant. Højden på det syntetiske græs vil variere (se dit specifikationsark). Skumpuden er gennemtrængelig, så det er ikke nødvendigt med ekstra forberedelse for at få produktet til at dræne lodret.
Når det knuste materiale er komprimeret og klar til PolyGreen Foam-puderne, skal de lægges på en passende måde. Puderne må ikke syes sammen.
Krav til dit projekt.
Installation ekstra:
Hvis du er i tvivl om legepladsens sikkerhed, kan du henvise til de standarder, der er fastsat af National Parks andRecreation Committee, for at sikre, at du bygger i overensstemmelse med reglerne. Du kan også støtte dig til en Certified Playground Safety Inspector (CPSl), som kan hjælpe dig med at identificere de specifikke krav til dit projekt.

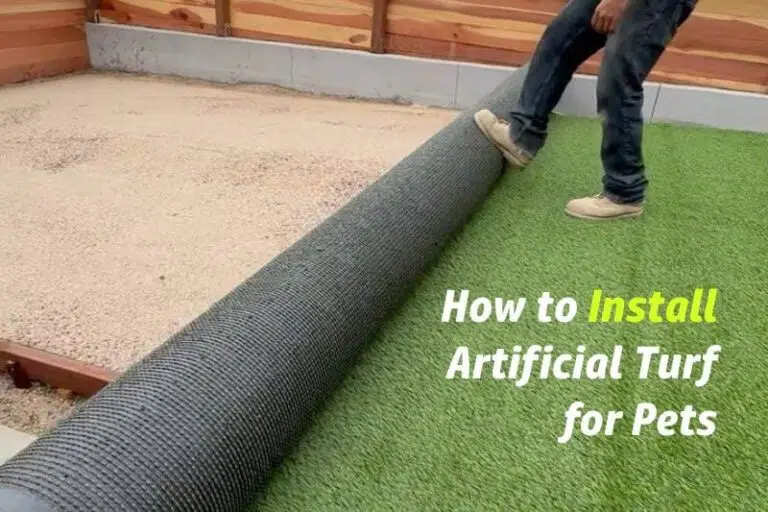
5. Læg kunstgræsset på plads.
Før du lægger ruller på underlaget, skal du sørge for at finde ud af, hvilken retning "kornet" skal løbe i. (Kornet er den retning, som fibrene skal ligge i.) Det er almindelig praksis, at kornet hælder mod det mest synlige udsigtspunkt. Græsset ser altid bedre ud, når fibrene peger mod dig end væk fra dig.
Når det er sagt, skal du starte i den ene ende og sætte hver rulle på plads (med den rigtige fiberretning) og sikre, at hver rulle samles og skaber deres respektive søm. Vær opmærksom på, at der kan være en eller flere genstande, der skal skæres rundt om, f.eks. træer, sten, legepladsstænger osv. Det første mål med at lægge græsset er at få begge ruller, der skal skabe sømmen, så tæt på som muligt. Hvis der er forhindringer (træer, sten, pæle osv.), skal du skære en eller flere ekstra sømme for at sikre, at græsset ligger fladt. Det anbefales at skære sådanne "ekstra sømme" med mindst mulig afstand til græssets kant (uanset om det er sømmens kant eller græssets yderkant).
Når du har lagt hver rulle fladt ud, er du klar til at klippe din søm.

6.Klip søm(me) i kunstgræsinstallationen
Der er to forskellige måder at sømme på, afhængigt af hvilket græstæppe du har valgt. Nogle produkter har en urethanbelagt bagside, mens andre har en fastgjort pude. Typisk skæres sømmene på urethanbagsiden fra bagsiden, og sømmene på skumbagsiden skæres fra toppen.
6-1 Falsning af en urethan-bagbeklædt græstørv

Med en rullegræsbund er det eneste, du skal gøre, at skære en række eller "kanal", der skal følges fra den ene ende af rullen til den anden. Det, vi mener med en "kanal", er det område, der skabes på bagsiden af græstørven mellem to tuftede rækker. Du skal vælge en kanal ca. 3 til 5 tuftede rækker indad fra kanten af græstørven. Når du har valgt din kanal, skal du bruge en cushion back cutter, starte i den ene ende og følge kanalen til den anden ende af græstørven. For at opnå en god søm er det meget vigtigt ikke at krydse over i en ny kanal. Hvis du kommer til at krydse over, skal du bare starte forfra i en ny kanal.
6-2 Sømning af græstørv med skumbagside

Et produkt med skumbagside skjuler de kanaler, der normalt ses fra bagsiden. Derfor er du nødt til at skære fra toppen.
For at skære fra toppen skal du bruge et par værktøjer. Det første værktøj du skal bruge, er en rækkefinder (en En syl eller en flad skruetrækker fungerer godt). Skub rækkefinderen fremad for at forstyrre fibrene og skabe en visuel linje, som du kan følge (hvis du skubber i én retning i forhold til en anden, får du et bedre billede ... så tjek, før du begynder at klippe). Når du har skubbet rækkesøgeren gennem hele "kanalen", tager du din pudebagskærer og skærer din søm.
En god måde at skære fra toppen på er at Kør din rækkeskærer et par gange. Lad kniven glide. Slip kniven, og skær derefter.
7. Opsætning og limning af sømme i græsinstallationer
Når du har klippet alle dine sømme ... juster hver rulle for at sikre, at kanterne sidder ordentligt sammen. Den ene side kan røre ved den anden, men du må ikke have overlappende kanter eller tvinge de to kanter så meget sammen, at de danner et omvendt "V". Ideelt set skal du sørge for, at sømkanterne ikke er længere end 1/8″ fra hinanden.
Bemærk venligst:
Sømmen skal se godt ud før limning. Brug en sømrulle og/eller en kost til at fnugge og manipulere med fibrene, så du får en bedre fornemmelse af, hvordan sømmen kommer til at se ud. Du skal aldrig regne med, at udfyldningen hjælper med at skjule din søm.
Justering af en usamarbejdsvillig søm ...!
Hvad gør du, når du har en søm, der ikke går ordentligt sammen? Sømmen ser bare ikke godt ud ... selv om du har klippet sømmene helt rigtigt. Du kan uundgåeligt løbe ind i en situation, hvor du måske har et hul nogle steder og et overlap andre steder. Et overlap er bedre end et hul, fordi du kan trimme den overlappende kant. Når det er sagt, hvis du kommer i en situation, hvor der er et hul i en del af sømmen, skal du bare sørge for at skabe et overlap i det område. Se diagram ONE på næste side for en illustration.

Diagram 1:

Hvis du finder ud af, at der er et uacceptabelt mellemrum mellem de to sømme. Fastlæg en god og en dårlig side.

Lav "uacceptable mærker". Det gør du ved at bruge fortovskridt til at lave linjer eller mærker på tværs af sømmen, hvor de(t) uacceptable mellemrum starter og slutter. Vend så sømkanten om, og overfør disse mærker til bagsiden.

Opret et "recut-nummer". For at oprette et sådant tal ... skal du måle bredden af mellemrummet i omtrentlige rækker og derefter tilføje 4 rækker til dette tal. Hvis dit største hul f.eks. er ca. 2 rækker ... så er dit genskæringstal 6.

Tag dit "omklipningsnummer", og tæl så mange tuftede rækker ind fra sømkanten, og klip om. Start på den ene side, og skær til det "uacceptable mærke". Når du er ved mærket, klipper du 90 grader mod sømkanten for at fjerne græstørv, og gentager processen på den modsatte side af sømkanten. På dette tidspunkt har du nu skabt en "fane".

Træk den dårlige side til den gode side, og klip den overlappende "fane", du skabte.

Du burde nu have en perfekt søm...!
Når din søm ligger helt rigtigt ... er du klar til at lime sømmen.
Til at begynde med, Træk den ene kant tilbage. Derefter let Skrab din base langs de to ender af den liggende kant. Du skal kun skrabe let i de to hjørner af den liggende kant ... ikke midt i sømmen). Formålet med disse mærker er at tjene som hjælp til at centrere din sømmåtte. Når dine mærker er nede ... Vend den anden liggende kant om. Du skal vende hver side ca. 2,5 meter hverDette skulle give dig rigelig plads til at lægge din sømdug og klæbe lim på den.
Når du trækker den anden kant tilbage, vil du Centrer din sømmåtte langs de to let skrabede mærker, du har lavet i din base.
Når stoffet er centreret ... sørg for, at stoffet ikke bevæger sig. Du ønsker ikke, at stoffet skal bevæge sig på grund af pludselig vind eller under limning. Det gør du ved at sætte søm i hver ende af sømmen og nogle tilfældigt placerede søm i midten. Hver 10′-15′ bør være tilstrækkeligt. En hurtig påmindelse ... sørg for, at du ikke laver buler i din base, når du sætter søm i ...!
Når sømmåtten er centreret og fastgjort... Gå i gang med at sprede limen. En 1/8″x1/8″ 'V-notch' eller 'U-notch' murske bruges typisk med de fleste af nutidens kunstgræsklæbere. Brug dog en spartelstørrelse, der er anbefalet af limproducenten. Hvis du bruger en spartel med for stort hak, risikerer du at få for meget lim på sømdugen, som så kan sive op mellem sømkanterne og klumpe fibrene sammen, hvilket resulterer i en ikke helt perfekt søm.
Når du er færdig med at lægge dit klæbemiddel, er du klar til at Læg dine græstørvskanter ned på limen, og luk sømmen.. Før du lukker sømmen, skal du sørge for, at bagsiden af hver sømkant og sømdugen er ren for snavs, og at limen har brændt ordentligt. ("Flash" henviser til den tid, limen skal bruge for at binde korrekt).
På grund af de mange forskellige klæbemidler, der findes, er det bedst at spørge klæbemiddelproducenten om den anbefalede tørretid og størrelsen på den anvendte spartel.
En god måde at lægge græsset tilbage på er ved først at studere "fibrenes placering" i forhold til sømmen, hvor fibrene typisk vil læne sig væk fra sømmen på den ene side og ind mod sømmen på den anden side. Du skal først installere den side, hvor fibrene ligger væk fra sømmen.. Læg derefter den anden side ned. Dette sikrer, at du ikke fanger eller skubber fibre ind i limen, når du lægger den anden side.
Hvis du støder på et scenarie, hvor begge kanter hælder ind mod sømmen ... er det bedst at lægge begge kanter på samme tid. Start i den ene ende, og arbejd dig hen mod den anden ende, så begge kanter samles som en lynlås.
Når du har lagt begge sider af sømmen ned på klæbemidlet ... Gå videre og brug en sømrulle langs hele sømmens længde. Rullen vil ikke kun hjælpe med at manipulere fibrene, så sømmen skjules bedre, men også med at skubbe græstørven ind i klæberen.
Det anbefales også at bruge en tung rulle (f.eks. en vandfyldt græstørvsrulle eller en tung vinylgulvrulle på 75-100 pund) langs sømmen. Det hjælper med at skubbe græsset ind i klæbemidlet for at sikre en stærk binding. Hvis du ikke har adgang til en tung rulle (ikke en dobbelttromle), skal du sørge for at gå (med små skridt!) langs hele sømmen, så din vægt giver det nødvendige tryk for at sikre en god binding.
På dette tidspunkt er det ikke nogen dårlig idé at slå søm i langs hver side af sømmen. Et for hver 6″-18″ langs hver side bør være tilstrækkeligt til at holde sømmen tæt og minimere enhver bevægelse langs sømmen - tænk på dette trin som "sømforsikring" ...! (Bemærk, at du kun skal gøre dette, når dit græstæppe ligger direkte på en samlet base. Brug ikke søm langs en søm, når græsset ligger oven på en legeplads).
Installation ekstra:
Hvis du har 3 eller flere ruller, som du sømmer sammen, er det god praksis, at du, når du har sømmet rulle #1 og #2 sammen, sparker let til rulle #2 i retning af rulle #3 for at sikre, at rulle #2 er strakt ordentligt ud før sømning. Dette vil minimere eventuelle bobler i græstæppet.
8. Skær perimeterkanten til kunstgræs
Når sømmene er lagt, skal ALT græs sparkes (eller fejes i én retning) for at strække græsset en smule, før kanten skæres og fastgøres.
Brug en tæppekniv til at skære kanten. Hvis du arbejder i et åbent område, der ikke er afgrænset af en stenmur, et hegn osv., anbefaler vi, at du bruger fortovskridt til at tegne kanten oven på græsset, før du klipper græsset. Når du er tilfreds med den form, du har tegnet ... følg din linje og klip.
Til at skære den ydre kant (i det åbne rum) anbefaler vi at bruge en rød loop-pile cutter. Du skal skubbe frem med denne kniv, og på den måde får du et mere kontrolleret snit langs den linje, du har skabt. Vær opmærksom på, at du måske bliver nødt til at skifte kniv en håndfuld gange for at skære din endelige form, da din kniv uden tvivl vil blive sløv.
Når du har skåret din endelige form ... gå videre og fjern de overskydende stykker græstørv.

9.Fastgør perimeterkanten til kunstgræs
Der er et par måder at sikre dit græs på, her er et par tilgange:
9-1 Søm langs den ydre kant

Brug 6″ træsøm. Vi anbefaler, at du placerer sømmet ca. ½" til 1″ fra kanten og hver 6"-12″ rundt om omkredsen. Når du støder på en søm, anbefales det at placere 2 søm i hvert hjørne ... et tættest på hjørnet og et andet mod midten af sømmen. Det giver dig 4 søm langs enden af hver søm.
Tilføjet note:
Når du hamrer sømmet på plads ... bank på sømmet, indtil hovedet kommer lige under fibrenes spidser ... børst derefter fibrene med din hånd for at rette dem op ... hamr derefter sømmet lidt mere ind ... børst fibrene igen, og hamr så igen. Dette trin skulle hjælpe med at sikre, at der ikke kommer så mange fibre i klemme under sømhovedet.
9-2 Perimeter sømbræt

Ved at bruge trykimprægneret eller konstrueret tømmer (2x4) til at skabe et "sømbræt" får man en stærk, sikker kant. Det kræver planlægning, da sømbrædderne skal monteres før underlaget. De kan fastgøres ved at 1. skrue dem fast på træpæle (i flugt med toppen); 2. bruge armeringsjern - bor et hul gennem brættet og hamre armeringsjernet ned i jorden; eller 3. skrue dem fast i beton med betonspecifikke skruer (f.eks. Tapcon). Når de er installeret, skal du sikre græsset med galvaniserede hæfteklammer for hver 3″-5″ langs sømbrættet.
Installation ekstra:
Du kan skære græstørven til kanten af sømbrættet eller efterlade et lille udhæng og derefter vikle og hæfte græstørven fast på bagsiden af sømbrættet.
9-3 Ukrudtsdug og træsøm
Ved at kombinere brugen af en ukrudtsdug af kommerciel kvalitet og 6″ træsøm kan man få en stærk og sikker kant. Tag en 3' eller 4' bred rulle kommerciel ukrudtsdug og læg halvdelen (af bredden) fladt under perimeterkanten. Klip til efter behov. Når den første halvdel ligger pænt under græsset... begrav den anden halvdel af ukrudtsdugen under den tilstødende landskabspleje. (græs, sten, meget osv.) Når begge sider sidder pænt ... lim ukrudtsdugen fast på undersiden af græsset. Når du har limet den ene halvdel på græsset, skal du bruge 6" træsøm langs yderkanten. Se 9-1 for flere detaljer om brug af søm.
10. Komprimer græsset med passende fyld. (Hvis nødvendigt.)
Før du spreder topdressingen eller "infill", skal du børste dine fibre ("mod kornet") for at få dem til at rejse sig så godt som muligt. Brug derefter en dråbespreder til at fordele en lille mængde infill jævnt. (Ved påføring af sandfyld skal du sprede ca. 1 til højst 1,25 pund pr. kvadratmeter ad gangen.) Hvis du installerer for meget på én gang, vil det knuse fibrene og skabe ujævne pletter overalt. Disse ujævne pletter vil skabe et færdigt udseende, der ikke er ideelt. Hvis du har nogle ujævne områder, kan du bruge en løvblæser til at sprede noget af det ekstra infill, så det får en mere ensartet konsistens.
Når du har installeret din udfyldning i den rette mængde. Du er klar til at rydde op.
11. Ryd op og nyd fordelene
Før du fordeler topdressingen, eller "infill", skal du børste dine fibre ("mod kornet") for at få dem til at rejse sig så godt som muligt. Brug derefter en dråbespreder til at fordele en lille mængde infill jævnt. (Ved påføring af sandfyld skal du sprede ca. 1 til højst 1,25 pund pr. kvadratmeter ad gangen.) Hvis du installerer for meget på én gang, vil det knuse fibrene og skabe ujævne pletter overalt. Disse ujævne pletter vil skabe et færdigt udseende, der ikke er ideelt. Hvis du har nogle ujævne områder, kan du bruge en løvblæser til at sprede noget af det ekstra infill, så det får en mere ensartet konsistens.
Konklusion: Nyd en perfekt installeret kunstgræsplæne
Installation af kunstgræs er en praktisk måde at skabe et vedligeholdelsesfrit, grønt og langtidsholdbart uderum på. Fra forberedelse af underlaget til fastgørelse og børstning af græsset spiller hvert trin en afgørende rolle for at opnå et glat og naturligt udseende resultat. Uanset om du opgraderer en baghave, et sportsområde eller et kommercielt landskab ved at installere kunstgræs, sikrer korrekt installation, at dit kunstgræs forbliver smukt og holdbart i årevis. Hvis du vil have professionel vejledning i installation af kunstgræs eller kunstgræs af høj kvalitet, kan et samarbejde med en erfaren producent som MightyGrass hjælpe dig med at opnå en fejlfri finish fra start til slut.
Videoer om, hvordan man installerer syntetisk græs:
Få et klart, trinvist overblik over installationsprocessen for kunstgræs, fra forberedelse af underlaget og lægning af græsset til sikring af sømme og tilføjelse af fyld. Denne video (fra NAMGRASS) demonstrerer de vigtige værktøjer, materialer og teknikker, du skal bruge for at få et glat, professionelt resultat. Uanset om det drejer sig om en sportsbane, en putting green i baghaven eller græs på altanen, kan du følge MightyGrass' eksperter og sikre en perfekt installation hver gang.
OFTE STILLEDE SPØRGSMÅL: Alt hvad du behøver at vide om installation af kunstgræs
Hvad er processen for installation af sportsgræs?
Anlæg af sportsgræs omfatter flere trin, der i høj grad ligner processen for anlæg af kunstgræs beskrevet ovenfor, herunder klargøring af banen, konstruktion af drænunderlag, udlægning af græs, spredning af fyld og markering. Det anbefales at tilføje et stødabsorberende lag mellem kunstgræsset og underlaget. Korrekt nivelleret infill sikrer spillernes sikkerhed og en ensartet boldbane på hele banen.
Hvordan installerer man en putting green i baghaven?
For at bygge en putting green i baghaven skal du starte med at skabe et komprimeret underlag, installere en ukrudtsbarriere og derefter lægge og sikre græsset. Vælg rullegræs med en kort, tæt bunke for at få en realistisk boldrulning. Du kan tilføje konturer eller flere huller for at få en mere skræddersyet oplevelse.
Kan man installere kunstgræs på en altan?
Ja, det er enkelt og let at lægge balkongræs. Du har kun brug for en ren, flad overflade med tilstrækkelig dræning. Landskabsgræs uden fyld eller fliser, der griber ind i hinanden, er perfekte til små områder og nem gør-det-selv-installation.
Hvad bruges landskabeligt kunstgræs til?
Landskabeligt kunstgræs er ideelt til boligplæner, haver, legepladser og kommercielle udendørsarealer. Det giver et naturligt udseende med minimal vedligeholdelse - ingen vanding, klipning eller gødning er nødvendig.
Hvor kan jeg købe materialer til kunstgræs?
Du kan finde førsteklasses kunstgræsmaterialer - herunder græsruller, fyldsand, stødpuder og klæbemidler - i en professionel kunstgræsbutik eller direkte fra producenter som MightyGrass, der tilbyder både bulkleverancer og specialemballage til projekter og distributører.
Hvad er de vigtigste materialer, der bruges i kunstgræs?
Kunstgræs fremstilles typisk af PE (polyethylen), PP (polypropylen) eller nylongarn med en latex- eller PU-belægning på bagsiden. MightyGrass indeholder også funktionel masterbatch af høj kvalitet for at sikre holdbarhed, blødhed, UV-bestandighed og langvarig farvestabilitet.
Hvor meget koster installation af kunstgræs?
Omkostningerne til installation af kunstgræs varierer afhængigt af områdets størrelse, forberedelse af underlaget, græstype og fyldmaterialer. For boligplæner eller putting greens ligger priserne typisk mellem $5 og $15 pr. kvadratmeter, mens sportsplæneprojekter kan koste mere på grund af specialiseret underlag og drænsystemer.
Er det værd at hyre professionelle til at lægge græs?
Ja, især til store eller sportslige anvendelser. Professionelle installatører sikrer korrekt dræning, glatte sømme og sikre kanter - og forlænger græssets levetid og udseende. Til mindre gør-det-selv-projekter som altaner eller baggårde kan du følge enkle installationstrin med basalt værktøj.